Saturday 18 January 2014

Do More With Windows 7 Sticky Notes


Do More With Windows 7 Sticky Notes


Would you like an easy way to write down a quick note and keep it in front of you without wasting a piece of a dead tree?  Let’s take a look at the Sticky Notes app in Windows 7 and how you can use it to its fullest potential.

Getting Started With Sticky Notes
If you’ve searched the Desktop Gadget Gallery for the Sticky Notes gadget from Windows Vista, you don’t have to search any more.  The Vista Gadget has been replaced in Windows 7 by the Sticky Notes application.  You’ll find it under Accessories in the start menu, or just type Sticky Notes in the Start Menu search.
image
Sticky Notes are great for jotting down some quick text you need to remember, like an address you receive over the phone or the items you need to pick up from the store on the way home.  Here’s how a default note looks: yellow with 11 point Segoe Print font.

You can easily change a note’s color from the right-click menu.

If you paste text into the Sticky Note, it will maintain most of its original formatting.  You’ll notice a scroll bar on the right if there’s more text than can be displayed on the screen; you can also drag the bottom right corner to resize the note to any size you want.

Click the plus sign in the top left corner to crate a new note, or click the x in the right corner to delete an existing note.

Windows will double-check that you want to delete the note; if you don’t wish to see this message each time, check the Don’t display this message again box.

All of your Sticky Notes are saved at:
%AppData%\Microsoft\Sticky Notes\StickyNotes.snt
However, they’re not stored in a standard format, so you can’t overly use the data in the notes file.  If you would like to copy your open notes to another computer, though, you could copy and replace this file on the other computer.

Format Text on Sticky Notes
Although the Sticky Notes app doesn’t include any formatting tools, it still accepts many common keyboard shortcuts for formatting text.  These include:
  • Ctrl+B – Bold
  • Ctrl+I – Italics
  • Ctrl+U – Underline
  • Ctrl+T – Strikethrough
Press the keyboard shortcut to activate the formatting option, and press it again to turn it off as normal.  Again, this works the exact same as the shortcuts in Word or other common applications.

You can even make your text centered or right justified with these keyboard shortcuts:
  • Ctrl+L – Normal, left-justified
  • Ctrl+E – Centered
  • Ctrl+R – Right-justified

You can even make a simple outline in a Sticky Note.  To make an outline or list, press:
Ctrl+Shift+L
This will give you a bullet point, but press it again to cycle through the options displayed below.  On the 7th time, you’ll be back to plain, non-outlined text.

The next outline number or point will automatically appear when you press Enter.  This is a great way to jot down a simple schedule for the day, items you need at the store, or anything you can think of.

Windows 7 Integration
Sticky Notes are well integrated with Windows 7’s new features.  You can create a new note from the jumplist, and we recommend keeping Sticky Notes pinned to your taskbar so you can easily jot a note down.  If you have notes open when you shutdown your computer, they’ll be automatically opened when you reboot just like the Desktop Gadgets.

Unfortunately, Windows 7 doesn’t treat each note as an individual note in the taskbar or Alt+tab, but if you hover over the note thumbnail you’ll get an Aero Preview of the notes while all the other windows turn translucent.  This is a great way to see what you’d written down without minimizing your windows.

Windows 7 even indexes your Sticky Notes, so you can easily find your notes from the Start Menu search.  If you enter something that you’ve written on a Sticky Note, you’ll see it come up in the search results.  This is one major advantage of the older Desktop Gadget.

Conclusion
Although Sticky Notes is not a groundbreaking new feature in Windows 7, it is a nice little application that makes it easy to jot something down.  It’s no replacement for OneNote or Evernote, but it is great for keeping a quick note in front of you so you won’t forget it.  With these tips and tricks, you should be able to get more use out of the Sticky Notes feature.

Friday 25 March 2011

How to Reset and Clean the Notification Icons List in Vista

METHOD ONE:
Through the Start Menu

1. To Close Explorer.exe -

A) Open the Start Menu.

B) Press and hold Ctrl+Shift and right click on a empty area of the Start menu.
C) Release Ctrl+Shift and click on Exit Explorer.


2. To Restart Explorer.exe -

A) Do steps 1 and 3 in Method Two below.


METHOD TWO:
Through Task Manager

1. Open Task Manager.
NOTE: Press Ctrl+Shift+Esc, or right click on the taskbar and click Task Manager.

2. To Close Explorer.exe -

A) Click on the Processes tab.

B) Click on explorer.exe and click on the End Process button.

C) Click on End Process in the confirmation prompt.

D) You will now notice that Explorer has stopped.
NOTE: The taskbar, deskop icons, and any open Windows Explorer windows are now gone.

3. To Restart Explorer.exe -

A) Click on File in Task Manager.

B) Click on New Task (Run...).

C) Type explorer.exe and click OK.

D) You will notice Explorer restarting.
NOTE: The taskbar and desktop icons will be back.

4. Close Task Manager.

Tuesday 3 August 2010

Setting Your Default Theme in PowerPoint

This didn't work in Powerpoint 2007/2010, but it can be used to find the correct path to the necessary files.

http://blogs.msdn.com/b/powerpoint/archive/2006/10/31/quick-try-this-setting-your-default-theme-in-powerpoint.aspx

Create a torn paper effect in PowerPoint

This video shows how to do this. It involves using the  free-form shape from the Drawing section of Home, changing the colour and cropping the image.

http://screenr.com/oIh


Saturday 16 January 2010

Media Sharing is disabled automatically - Media Player

I recently bought  a radio from Marks and Spencer. It plays FM and DAB stations, podcasts  and music from my PC via Windows Media Player (WMP).

I had it set up to play everything except music from my pc. I followed the manual to set up WMP 11, but without success. I couldn’t think what I was doing wrong, so I phoned the Help Desk only to be given the cliché “Turn it off and on again”. When I suggest that wasn’t the problem, I was advised to return the radio.

I didn’t think there was anything wrong with the radio, so I was reluctant to do that. I searched the Web and found the following fix…

RE: Media Sharing is disabled automatically


OK. I figured it out.


As for the message about "Media Sharing has been disabled", that message went away when I did two things (Not sure which one helped). Remember, my
sharing worked despite this message. That is, as soon as I launched Media  Player, the sharing worked AND I got the message at the same time.:

1- Enabled the Windows firewall. I usually keep all firealls off on this machine because the network is all trusted and out of the blue things seem to start getting blocked. It is still turned on now and all the networking shares, etc. seem to be working, so I will leave it for now.

2- Removed all users except me on this machine (Vista Ultimate x64). Not sure if this did anything, but I read an article about Media Sharing not turning on if two users have sharing enabled. My other user account was
unused, so not a problem for me. I would try this option last, after the next thing here:

3. As for the service not starting until Media Player started, I think this did the trick:

Make sure the "Windows Media Player Network Sharing Service" is set to start up with "Automatic". Mine was set for "Automatic (Delayed Start)," which I believe means it doesn't start until it is first called upon...by Media Player (apparently the listener doesn't activate it.).

Here is how I managed that: right-click Computer, chose 'manage' go to 'Services and Applications', chosse 'Services', find 'Windows Media Player Network
Sharing Service', right-click, choose 'properties', under the 'General' tab, choose 'Startup type' as 'Automatic'. Apply and exit.


Hope this helps.

Media Sharing is disabled automatically - Media Player

http://forums.techarena.in/media-player/812366.htm

Tuesday 12 January 2010

Save Your Outlook Calendar as iCal

How can I export my Outlook 2007 Calendar as an iCal file?"

Outlook 2007 makes publishing an iCal file a little confusing because the option isn't part of the "Import and Export" options. Instead of using the Import and Export wizard in Outlook, you need to be in the Calendar view and File > Save As.

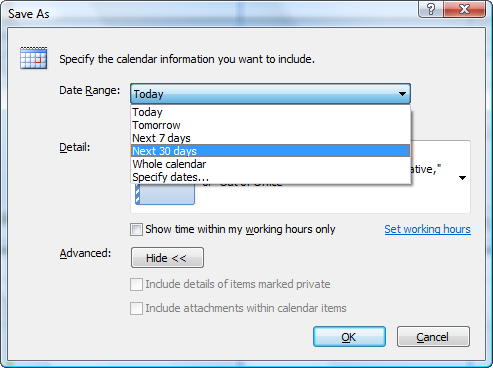
By default, the Save As will export your calendar as an iCalendar .ics file of the current day.

Clicking the "More Options" button allows you to save as much of your calendar as you want to export as an iCalendar.


Import to Windows Live Calendar

It's possible to import Vista's calendar data into Windows Live Calendar.
Try this:

1) log into calendar.live.com
2) Press Subscribe
3) Import from an ICS file
4) Browse for the calendar you'd like to import (Windows calendars' files
are stored here C:\Users\USER_NAME\AppData\Local\Microsoft\Windows
Calendar\Calendars\)
5) Click "Import Calendar"